Thursday, March 8, 2012

Chicken Wire...Who Knew


One of my new favorite things, or two new favorite things, are chicken wire and old wood!! Love! I had my husband pull some planks of old wood off of a house that he is remodeling and then the fantastic man that he is cut the wood down and made frames!! He also is the one responsible for grabbing some chicken wire for me! Love that man! So with my "new" products I decided to make myself a jewelry holder for my bathroom wall! Very rustic and gorgeous!! Not to mention EASY!!


All you need is:

A frame of your choice
Chicken wire
Wire cutters
Staple gun and Staples


It was simple enough. I just laid my chicken wire on the back of my frame and cut away the excess with the wire cutters. Once I had my chicken wire to the size I needed I started stapling. 


Above is what the back looked like after I finished stapling. The wood was a really tight grain and old so the staples didn't want to go all the way in. But with a little help from my friend the hammer, we solved that problem.  Below is a view from the front after we attached the wire!


This is just an extra picture to show you a little bit more of the frames that my hubby made for me.  He put some thin wood as backing, so once the picture is in place all you will see it the rustic edge! Love this frame, and its HUGE!!


Finished product on the wall!! Time to accessorize! 


I really love how this turned out! It is so rustic and goes great in my bathroom! I am thinking of doing another one for the kitchen. But with that one I might use some clothes pins to hold up notes, cards, kids artwork, etc. I also really love the wood for this. I did not do a thing to it, just keep it like it came off the house and its gorgeous!  Quick and easy project that you should definitely give a try!! Enjoy!!


Thursday, March 1, 2012

Birds Nest Necklace


DIY Birds Nest Necklaces...YES Please!! I love these necklaces and I said that every time I looked at a picture of one. Well I decided to go ahead and attempt one. They are so easy!! Plus you don't need a ton of supplies to make them!

Here is what you need...
Glass pearls (or any bead you like in whatever size you like)
20 or 24 gauge jewelry wire (whatever size and color you prefer)
Chain or twine
Jewelry Clasps
Needle nose pliers and wire cutters


To start string however many beads your using on your jewelry wire and go down about 3 in., then arrange them however you like and circle the rest of your wire around the outside of your beads.


Next you will wrap your wire around the backside of your beads 4-5 times to create a base for your nest.


Now hold the beads between your thumb and pointer finger and begin to wrap the wire around the outside of your beads to make the actual nest. How many times you do this depends on how large you want your nest. I like mine thicker, it makes for a bigger charm. Also I will say this, whenever you think you have yours thick enough add one or two more circles, when you run your wire through the nest it can have a shrinking effect (or to me anyhow).


Happy (Early) Birthday Dr. Seuss


Happy Dr. Seuss Week! Here at the Jackson residence we LOVE Dr. Seuss!! In case you have not seen all the posts, there is one of the boys Dr Seuss birthday party! We have also done the boys bathroom in Dr Seuss! I will have to work on Dr Seuss's actual birthday, so me and the boys celebrated a little bit early with some finger painting! Finger painting is my favorite thing to do with the boys! They love doing it! Partly because of the end product, but mostly because they get to make a big mess!! Its great for me because the finger paints are 100% washable!! 


Since the boys party was Thing 1 and Thing 2, and they are at the ages 1 & 2, I thought a Thing 1 and Thing 2 art project would be fitting! I got us ready by painting a simple canvas a bright yellow and letting it dry. Then I just hot glued some ribbon to the back of the canvas (we are hanging this on our playroom door).


I tried to get pictures of the boys doing their artwork, but no luck! Like I said they like to make a big mess! But below is their finished product! I painted the face and Thing spots for them and we were all done! Will (my 2yr old) points to this and claps every time he goes into the playroom!! Love this and so did the Kiddos!


Below is just  a picture of a quote in the boys bathroom! I just used my Cricut to cut it out and place it on the wall. Its one of my favorite Dr. Seuss Quotes and a good rule we try to always follow!!

Happy Birthday Dr. Seuss!!


Pinch Me


At our house we try to do our holiday finger paintings a bit early. That way they can sit on display in the living room for a while! So me and the boys got ready for St Patricks day with some Leprechaun Handprints! Since they are only 1 & 2 I get to help out a little extra, but thats just fine with me. One day, too soon, they will be big enough to do these art projects all on their own and then probably not at all :( (they grow up to fast). All I did was take a simple canvas and painted it a pretty sky blue. Once that dried I painted a rainbow and pot of gold! Now bring in the kiddos!!


Couldn't resist adding a sweet picture of each of my babies. It was impossible to get one of them in action because paint was everywhere!! But here they are having their post painting lunch! Are they not the cutest kids EVER (well to me they are)!!


Below is their finished product!! I added a face and we cut out some hats from construction paper to finish it off. Now it gets to sit on our mantel for everyone to see until its time for us to do our Easter Project!! So Fun!! Hope everyone has a great St Patricks Day (when it gets here that is :) ).


Wednesday, February 22, 2012

A Belated Valentine's


Happy Belated Valentine's Day! We have been busy this past week so I haven't gotten a chance to post the cute items we made for Valentine's! First of all me and the hubby decided to do something different this Valentine's. We started a message board to each other to help "remind" each other of some of the reasons we love and appreciate each other.  In day to day life we can sometimes get a bit busy and forget to say thanks for the little things that add up to be BIG things! 

All I needed was:
A cute frame
Felt
Scrapbook paper
Hot glue

I found a frame that I liked at Walmart, had the mat in it already.  Then I downloaded a font I liked from Kevin & Amanda (link below and love love love their site), and then I printed what I wanted our message board to say directly on to my scrapbook paper. I saw this idea on Pinterest and have linked the original blog below. I really like how simply she did this so I went with her saying of, I love you because... 

Then I used the felt to make a few flowers and hot glued them to the corner of our frame. We use a dry erase marker and just leave each other our notes. The only rule we have is that what you leave has to be something positive. Whether its flirty or funny or serious. We Love this message board!!


Sweet Sundae's


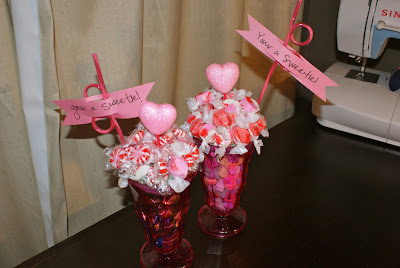
This was another project we did for Valentine's Day! It turned out so good!! I wanted the boys to have something homemade and cute to give out for Valentine's and this is what we decided on. Again, I found the idea on Pinterest and am linking to the blog below. 

Here is what we needed for this project:
Sundae Glasses (Hobby Lobby)
Styrofoam (I like the floral foam balls for this project)
Candy
Straws (optional, you could use pixie stix instead)
Paper

If you use a styrofoam ball, cut it in half, then turn your sundae cup upside down so the open end is on top of the styrofoam. Then cut around the glass. You want the styrofoam to fit snuggly into the top of your glass.  Go ahead and fill your cup with whatever candy you like (in one glass I used and assortment, in the other I used conversation hearts). Next place the styrofoam in the top of your glass. Place your straws, or pix stix where you like them and then begin to hot glue your remaining candy (we used peppermints and taffy) to the top of your styrofoam.  I printed what I wanted my tags to say on some construction paper then cut they out. We went with "Your a Sweetie!". To top it off we found some cute styrofoam hearts on a stick at the Dollar Tree (supposed to be our "cherry on top") but you could always just use a chocolate heart candy. Super cute gift for any Holiday! Enjoy! 


Linking up to:


Thursday, February 9, 2012

Love Is In The Air


 I love Valentines! Well now that I am married and have two precious little boys to be my Valentines, I do. While out shopping I came across these super cute mailboxes in the dollar section at Target and grabbed them. Then a few days later I saw a great idea on Pinterest (yes I am an addict) that used candlesticks as posts for your mailbox. Well I loved the idea but couldn't find any cheap candlesticks, and ran out of time to look (bummer), so I used what I had on hand.  I just so happened to have two metal candle holders (dollar tree, that store makes me so happy) that I thought would work.


I just had to do a little modifying and my candle holders became mailbox posts!  All I did was bend the flat metal part that the candles sat on, this was fairly easy, until they snapped off and that was that.


Next up, I went to my handy dandy Cricut and used my Storytime Cartridge and cut out some sweet little hearts for our mailbox flags. Peel them off your mat and put them in place. Then I used my Varsity Cartridge to cut out the first initial for each of my boys (I was hoping this font would help it look like a little boys mailbox). I played with the idea of cutting out numbers (their birth dates) for the mailbox number, but to me simple looked better so I just left it at the heart and initial. Sorry about the glare on the picture below!


It All Comes Out In The Wash


I have watched The Duggar's on tv (TLC) for a while now and love them! I happened to watch one episode that showed them making their own laundry detergent and thought  yea right, not this girl. Well that was years ago and definitely well before I had two children that can drain a bank account without a second thought. So for the past few weeks now I have been seeing all of the Pins on Pinterest for Homemade Laundry Detergent. Well I decided it was time to again, save a buck and give it a try. Oh, I was so not disappointed! I found a great blog with wonderful instructions (linked below) and decided to go for it. This recipe just so happens to be the same one that The Duggar's use (just a smaller batch). 
You are going to need the following:

2-5 gallon bucket
H20
1/2 cup Borax
1/2 Arm & Hammer Washing Soda
1/3 bar of Fels-Naptha (or Ivory 1/2 bar) Soap
Something to store your detergent in
Grater

You can find the 3 main cleaning agents in most stores. I got mine at Walmart and they were all on the laundry aisle, literally all sitting side by side. And the cost for all 3 was under $10.00!


First up you want to cut your Fels-Naptha into 1/3 pieces. Then just use a cheese grater (whatever you have will work) and grate 1/3 of your bar of soap. I made my detergent with Fels-Naptha but everything that I read said that if you used Ivory you would use 1/2 a bar of soap per batch and that it could go into the microwave to be shredded (instead of grating). Note, I have never done that, just read that  it could be done and that there is a you tube video that shows the end product. Just an FYI!


Once you have grated your soap you will put it in a sauce pot with 6 cups of water and heat it over low heat until all the shreds of soap are dissolved (do not let your soap come to a boil).


Babies! Babies! Babies!


As a mom of two (1yr and 2yr old boys, whew just saying that makes me tired), I am always looking to save a buck. Especially since both of my boys are still in diapers! Recently I found a recipe and tutorial for DIY baby wipes and thought I would give it a try. So far, So Fabulous!! They are easy and cheap! 
Here is what you will need:

Container (must be able to seal it to make it air tight)
Select a Size Paper Towels
Baby Wash
Baby Oil
H20 
Sharp Knife (non serrated)


Okay ladies (and gentlemen) grab a knife and vent your frustrations! You need a SHARP non serrated knife to cut your roll of paper towels in half. As you may notice below my knife was not as sharp as it should have been, note the uneven edges on the bottom of my towels, but hey they still clean a tushy!


Next up add 1 1/2 Tablespoons of baby wash, 1 Tablespoon of baby oil, (I like the one with Aloe) and 2 cups of water to your container and stir. My container came from Walmart ($2) and its a 2 quart size. At first glance I thought it was going to be to small but I was able to do a little pushing and it worked great. 


Now that you have your cleaning solution mixed, add your paper towels.


Go ahead and seal your container and flip it upside down. Keep it this way until the solution has saturated your paper towels throughly. Then flip it right side up.

Thursday, January 26, 2012

Etched Glass


I LOVE the look of etched glass and I had no idea how easy it was to do!! This is a new favorite project for me, especially when it comes to gift giving!! You have to try this! I wanted to test it out on something simple first (in case I messed it up big time, it wouldn't be a huge upset). I just grabbed a wine glass from the cabinet and away I went ( I also thought this would be  a great idea to remind my husband which wine glass is mine, and not to be drank from :-) ). Here is what you will need to get started:

Something glass (anything you like)
Adhesive backed vinyl
Transfer Paper (cling wrap, contact paper)
Glass Etch and something to apply it
Something to cut your vinyl, either a Cricut (or like machine) or just an exacto knife (if your good at free hand, which I am not)


I used my Cricut to cut out the letter that I wanted (normally I probably would have done a J for our last name, but I already had an A done and my name is Alison, so it worked). If you can't tell I am all about using what you have on hand, aka cost efficient!! After cutting out what I wanted I trimmed around my letter to remove the excess vinyl, then applied a sheet of transfer paper over the letter. Make sure you rub the transfer paper firmly over your vinyl to get a good stick.


Nap Time is Playtime For Mommy...Distressed Canvas


I have seen numerous "pins" on how to do a distressed canvas and have been really wanting to give it a try. So during my boys nap time I decided I would give it a go! They were relatively easy and the end product is very cute! I did one for each of my boys room as practice but next I would like to do a larger one for our living room (maybe above the fireplace??). Here is a list of materials you will need:

Canvas (whatever size you would like, mine are 8x10)
A photo of your choice, same size as canvas, needs to be from a inkjet printer (also make sure this is a picture that with look ok reversed, since the image will be flipped)
Spray bottle of water
Mod Podge (optional, and I like the clear)
Gel Medium (I use Golden Regular Gel, gloss)
Brush


To start you will put a layer of gel medium onto your canvas. You want this to be a nice coating, to thin and your image will not transfer well and to thick and its gonna be a big mess. 


After you coat your canvas, grab that picture! I again stress that this photo needs to be on regular computer type paper and printed by an ink jet printer. Take your picture and spray the ink side lightly with water. This is going to help your image transfer better. Place your picture, image side down, onto your gel'd canvas and smooth it out. Now you will want to let this dry overnight or at least 6 hours. Below is a photo of what it looks like dry.


After your image has completely dried then you can begin the next process. First you need to spray your image with water until the image is clearly visible through the paper (photo below).