Wednesday, February 22, 2012

A Belated Valentine's


Happy Belated Valentine's Day! We have been busy this past week so I haven't gotten a chance to post the cute items we made for Valentine's! First of all me and the hubby decided to do something different this Valentine's. We started a message board to each other to help "remind" each other of some of the reasons we love and appreciate each other.  In day to day life we can sometimes get a bit busy and forget to say thanks for the little things that add up to be BIG things! 

All I needed was:
A cute frame
Felt
Scrapbook paper
Hot glue

I found a frame that I liked at Walmart, had the mat in it already.  Then I downloaded a font I liked from Kevin & Amanda (link below and love love love their site), and then I printed what I wanted our message board to say directly on to my scrapbook paper. I saw this idea on Pinterest and have linked the original blog below. I really like how simply she did this so I went with her saying of, I love you because... 

Then I used the felt to make a few flowers and hot glued them to the corner of our frame. We use a dry erase marker and just leave each other our notes. The only rule we have is that what you leave has to be something positive. Whether its flirty or funny or serious. We Love this message board!!


Sweet Sundae's


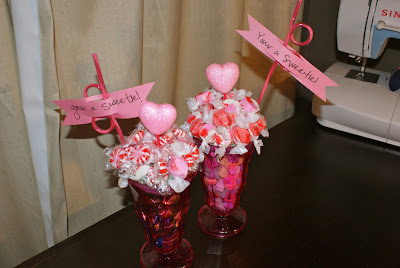
This was another project we did for Valentine's Day! It turned out so good!! I wanted the boys to have something homemade and cute to give out for Valentine's and this is what we decided on. Again, I found the idea on Pinterest and am linking to the blog below. 

Here is what we needed for this project:
Sundae Glasses (Hobby Lobby)
Styrofoam (I like the floral foam balls for this project)
Candy
Straws (optional, you could use pixie stix instead)
Paper

If you use a styrofoam ball, cut it in half, then turn your sundae cup upside down so the open end is on top of the styrofoam. Then cut around the glass. You want the styrofoam to fit snuggly into the top of your glass.  Go ahead and fill your cup with whatever candy you like (in one glass I used and assortment, in the other I used conversation hearts). Next place the styrofoam in the top of your glass. Place your straws, or pix stix where you like them and then begin to hot glue your remaining candy (we used peppermints and taffy) to the top of your styrofoam.  I printed what I wanted my tags to say on some construction paper then cut they out. We went with "Your a Sweetie!". To top it off we found some cute styrofoam hearts on a stick at the Dollar Tree (supposed to be our "cherry on top") but you could always just use a chocolate heart candy. Super cute gift for any Holiday! Enjoy! 


Linking up to:


Thursday, February 9, 2012

Love Is In The Air


 I love Valentines! Well now that I am married and have two precious little boys to be my Valentines, I do. While out shopping I came across these super cute mailboxes in the dollar section at Target and grabbed them. Then a few days later I saw a great idea on Pinterest (yes I am an addict) that used candlesticks as posts for your mailbox. Well I loved the idea but couldn't find any cheap candlesticks, and ran out of time to look (bummer), so I used what I had on hand.  I just so happened to have two metal candle holders (dollar tree, that store makes me so happy) that I thought would work.


I just had to do a little modifying and my candle holders became mailbox posts!  All I did was bend the flat metal part that the candles sat on, this was fairly easy, until they snapped off and that was that.


Next up, I went to my handy dandy Cricut and used my Storytime Cartridge and cut out some sweet little hearts for our mailbox flags. Peel them off your mat and put them in place. Then I used my Varsity Cartridge to cut out the first initial for each of my boys (I was hoping this font would help it look like a little boys mailbox). I played with the idea of cutting out numbers (their birth dates) for the mailbox number, but to me simple looked better so I just left it at the heart and initial. Sorry about the glare on the picture below!


It All Comes Out In The Wash


I have watched The Duggar's on tv (TLC) for a while now and love them! I happened to watch one episode that showed them making their own laundry detergent and thought  yea right, not this girl. Well that was years ago and definitely well before I had two children that can drain a bank account without a second thought. So for the past few weeks now I have been seeing all of the Pins on Pinterest for Homemade Laundry Detergent. Well I decided it was time to again, save a buck and give it a try. Oh, I was so not disappointed! I found a great blog with wonderful instructions (linked below) and decided to go for it. This recipe just so happens to be the same one that The Duggar's use (just a smaller batch). 
You are going to need the following:

2-5 gallon bucket
H20
1/2 cup Borax
1/2 Arm & Hammer Washing Soda
1/3 bar of Fels-Naptha (or Ivory 1/2 bar) Soap
Something to store your detergent in
Grater

You can find the 3 main cleaning agents in most stores. I got mine at Walmart and they were all on the laundry aisle, literally all sitting side by side. And the cost for all 3 was under $10.00!


First up you want to cut your Fels-Naptha into 1/3 pieces. Then just use a cheese grater (whatever you have will work) and grate 1/3 of your bar of soap. I made my detergent with Fels-Naptha but everything that I read said that if you used Ivory you would use 1/2 a bar of soap per batch and that it could go into the microwave to be shredded (instead of grating). Note, I have never done that, just read that  it could be done and that there is a you tube video that shows the end product. Just an FYI!


Once you have grated your soap you will put it in a sauce pot with 6 cups of water and heat it over low heat until all the shreds of soap are dissolved (do not let your soap come to a boil).


Babies! Babies! Babies!


As a mom of two (1yr and 2yr old boys, whew just saying that makes me tired), I am always looking to save a buck. Especially since both of my boys are still in diapers! Recently I found a recipe and tutorial for DIY baby wipes and thought I would give it a try. So far, So Fabulous!! They are easy and cheap! 
Here is what you will need:

Container (must be able to seal it to make it air tight)
Select a Size Paper Towels
Baby Wash
Baby Oil
H20 
Sharp Knife (non serrated)


Okay ladies (and gentlemen) grab a knife and vent your frustrations! You need a SHARP non serrated knife to cut your roll of paper towels in half. As you may notice below my knife was not as sharp as it should have been, note the uneven edges on the bottom of my towels, but hey they still clean a tushy!


Next up add 1 1/2 Tablespoons of baby wash, 1 Tablespoon of baby oil, (I like the one with Aloe) and 2 cups of water to your container and stir. My container came from Walmart ($2) and its a 2 quart size. At first glance I thought it was going to be to small but I was able to do a little pushing and it worked great. 


Now that you have your cleaning solution mixed, add your paper towels.


Go ahead and seal your container and flip it upside down. Keep it this way until the solution has saturated your paper towels throughly. Then flip it right side up.