
DIY Birds Nest Necklaces...YES Please!! I love these necklaces and I said that every time I looked at a picture of one. Well I decided to go ahead and attempt one. They are so easy!! Plus you don't need a ton of supplies to make them!
Here is what you need...
Glass pearls (or any bead you like in whatever size you like)
20 or 24 gauge jewelry wire (whatever size and color you prefer)
Chain or twine
Jewelry Clasps
Needle nose pliers and wire cutters

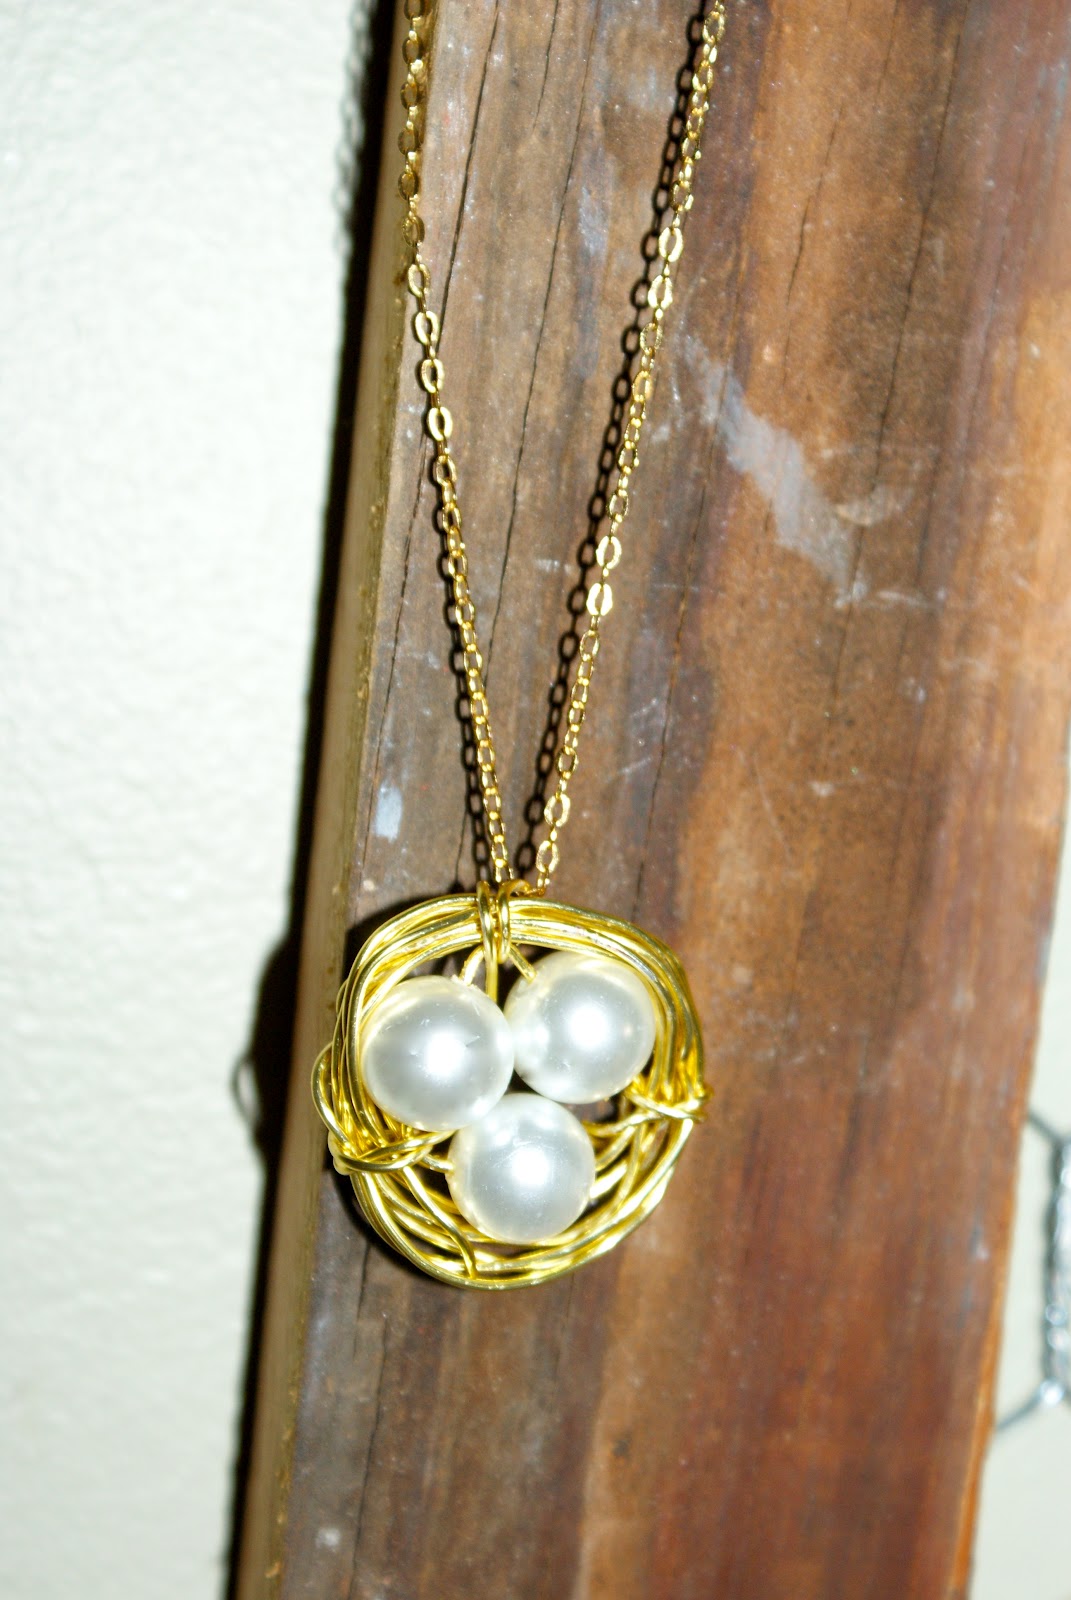
To start string however many beads your using on your jewelry wire and go down about 3 in., then arrange them however you like and circle the rest of your wire around the outside of your beads.


Next you will wrap your wire around the backside of your beads 4-5 times to create a base for your nest.

Now hold the beads between your thumb and pointer finger and begin to wrap the wire around the outside of your beads to make the actual nest. How many times you do this depends on how large you want your nest. I like mine thicker, it makes for a bigger charm. Also I will say this, whenever you think you have yours thick enough add one or two more circles, when you run your wire through the nest it can have a shrinking effect (or to me anyhow).

The picture below is how mine looked after I finished circling (I was using 24 gauge wire).


Okay now you need to unroll some extra wire (not sure the exact amount but probably 8-10 in) and cut so that your nest is separate from your roll of wire. Then take your extra wire and run it in the space between two of your beads, being sure to include all the wire from the base of your nest. Loop it through in the same spot 3-5 times, its just personal prefernce. Then repeat through the remaining 2 spaces between beads. You don't have to do these at all or you can do more than three, its going to be all about what you like.

When you finish all of your loops and you still have wire left, just wrap it around the base of your nest weaving it in between existing wire (this will hold it in place). Below is the back of my charm once I finished.

Now go ahead and add your jewelry clasp and its ready to be put on a chain or twine of your choice.

I also really love the birds nest necklaces with only one "egg". Below is one that I made using a large cream glass pearl and 20 gauge wire.

Same thing as before, just string your pearl, but this time I just bent a small section down to keep the pearl in place.

Then I began to wrap wire around my pearl while holding the pearl between my thumb and pointer finger as before. This time I did not make a base for my nest.

Just wrap until you like the look of it.

Cut your wire and tuck it in with the wire wrapped around your pearl. Attach a jump ring and DONE!


Above is just several that I have made as practice. Below is the one using 20 gauge silver wire and large pearl.


Below is the one from the top of the page. Turned out great!

Below is one that I made using 20 gauge gold wire and medium sized white glass pearls.
These are very easy and fun to make! I strongly suggest giving them a try for yourself and they make great gifts too!!
Linking up to:
I love this tutorial! Thank you for sharing! I wrote a blog post on my blog: www.mad4marvin.blogpost.com about using your tutorial for Back-to-School gifts for my nieces/nephews teachers!! Thank you!
ReplyDeleteThanks so much! And thank you for linking up! Your necklaces looked great!!
ReplyDeleteyurtdışı kargo
ReplyDeleteresimli magnet
instagram takipçi satın al
yurtdışı kargo
sms onay
dijital kartvizit
dijital kartvizit
https://nobetci-eczane.org/
E14WS
Erzurum
ReplyDeleteistanbul
Ağrı
Malatya
Trabzon
PWVA4
yozgat
ReplyDeletesivas
bayburt
van
uşak
CBZD
https://titandijital.com.tr/
ReplyDeleteafyon parça eşya taşıma
düzce parça eşya taşıma
erzincan parça eşya taşıma
elazığ parça eşya taşıma
Z0GA
E596B
ReplyDeleteMuğla Lojistik
Gümüşhane Lojistik
Yozgat Şehir İçi Nakliyat
Tekirdağ Cam Balkon
Ordu Lojistik
Ünye Koltuk Kaplama
Afyon Şehir İçi Nakliyat
Hatay Lojistik
Muş Evden Eve Nakliyat
A13D8
ReplyDeleteKırklareli Lojistik
Çorum Şehirler Arası Nakliyat
Poloniex Güvenilir mi
Karabük Şehirler Arası Nakliyat
Elazığ Şehirler Arası Nakliyat
Karabük Lojistik
Trabzon Lojistik
Yozgat Şehirler Arası Nakliyat
İzmir Parça Eşya Taşıma
730E5
ReplyDeletetestosterone propionat for sale
oxandrolone anavar
order steroid cycles
order steroids
trenbolone enanthate
anapolon oxymetholone for sale
masteron for sale
order dianabol methandienone
oxandrolone anavar for sale
CF70E
ReplyDeleteCoin Çıkarma
Binance Sahibi Kim
Coin Kazanma
Bitcoin Üretme Siteleri
Kripto Para Üretme Siteleri
Coin Nasıl Kazılır
Bitcoin Nasıl Para Kazanılır
Coin Üretme Siteleri
Coin Nasıl Alınır
9DDA1
ReplyDeletePinterest Takipçi Satın Al
Kwai Takipçi Satın Al
Soundcloud Dinlenme Satın Al
Btcturk Borsası Güvenilir mi
Alyattes Coin Hangi Borsada
Twitch İzlenme Satın Al
Nexa Coin Hangi Borsada
Wabi Coin Hangi Borsada
Caw Coin Hangi Borsada
12B71
ReplyDeleteOnlyfans Beğeni Hilesi
Pitbull Coin Hangi Borsada
Shibanomi Coin Hangi Borsada
Facebook Takipçi Hilesi
Binance Referans Kodu
Onlyfans Takipçi Hilesi
Twitch İzlenme Hilesi
Trovo Takipçi Satın Al
Binance Referans Kodu
9669157CBD
ReplyDeleteinstagram ucuz takipçi
552667C39A
ReplyDeleteinstagram takipçi alma
79CA09C201
ReplyDeletekadın takipçi
mobil ödeme takipçi satın al
fake takipçi
Happn Promosyon Kodu
Acemler Kimdir
Para Kazandıran Oyunlar
Total Football Hediye Kodu
Erasmus Proje
Malatya Bölgesinde Yapılacaklar